top of page
Christian Green
Character Artist
Demo Reel
2K Character Reel
NPC Maker
I developed this tool for Maya for creating a unique game ready NPC's in a matter of minutes.
UI coming soon!

This tool derives from a single head shader network powered by masks, textures, blendshapes and set driven keys.


Demon WWE2K24
This Demon character was designed for My Rise. The high res mesh was designed in Zbrush, low poly in Maya and textures in Substance Painter.


New Preset Characters WWE 2K24
Male
Female
For the creation of these character designs I led a team of several artists. I was responsible for implemenitng these assets into the game and making the final touches. This includes all new heads available in 2K23 & 24 as well. Those head scans were cleaned and implemented by myself. Below are the concept designs which were designed by me and my lead using instructed outputs from MidJourney where I then hand painted the final concepts in Photoshop where specific colors, patterns and materials were specified.


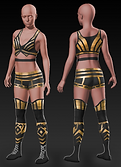


Space Armor WWE2K24


This modular set of armor was inspired by Robo Cop, Master Cheif and Mobile Suit Gundam. Each peice is selectable in game, allowing all to be used indivudally. I designed the High poly in Zbrush, did Retopology in Maya and textured in Substance Painter.
Modular Hero Armor WWE2K23


This generic set of hero armor was designed for WWE2k23 to allow players to design their own super heroes. The example above of Batman includes all seperated parts except for the bat ears, boots and gloves which were already in game. Below illustrates the versatility of these modular parts. The set doesnt normally include the bat ears. Those were a pre-exstiting part I added in-game.
.png)

WWE2K23 Character improvements
In 2K23 I made various improvments to the overall look of our base characters. This include the following:
- Realistic skin drawn directly from real head scans.
- New and improved Improved eye, eye brow, and eye lash textures.
- Improvments to the skin and eye materials for more photorealism.
Real time Michael Jordan

ESPN's "The Last Dance" documentary inspired me to create this model. Pushing realism for real time was my goal.

Below is a list of tricks that helped me push realism.
- Using separate geometry for tear build up between the eye and eye lid.
- Using individual fibers for fuzz and facial hair.
- Texture XYZ for skin textures.
- Sub surface scattering.
- Having plenty of photos to reference.
.png)
.png)

This model was sculpted in Zbrush and rendered in real time in Marmoset Toolbag.
Tom Selleck Likeness Sculpt

Tom Selleck felt like the perfect choice for a likeness sculpt. His bold facial features and iconic mustache seemed like a great challenge.

To start I use my base head mesh in Zbrush and push and pull the proportions to match a photo reference. I then carefully work my way up the subdivisions as it needs more detail. This project taught me to take my time and keep things simple until the final stages.

The most difficult part of any likeness sculpt is finding solid reference. Luckily I found decent photos of Tom without his mustache and a buzzed head. This helped tremendously for figuring out whats going on under all fo that hair. For the hair I used fiber mesh separated into several sections.


Real Time Hair

Using the IMM brush tool I made a custom hair model in Maya segmented into three separate poly groups. This way Zbrush can determine the beginning middle and end section of the hair card for the curve stroke.


I created the Hair texture using "HairStrand_Designer_V1". I separated portions according to different hair lengths, thickness and color.

Getting the IMM brush to curve in different directions
helped break up the repetition of the beard.
Stacking the hair cards from bottom to top was key in giving it a clean layered appearance.

.png)
.png)
3D Layout Environment
My task for this project was to concept and layout the CG scene to help the VFX team better understand the lay of the land. I created the environment using background stills, and Quixel Mega-scans for the rocks, cliffs and vegetation.

_.png)
For this project I treated the environment almost as if it were a character. Giving it charm and style without sacrificing realism was what eventually brought me to my finished look and layout.
Below is the final look developed by another VFX team as seen in episode 9 of Star trek: Picard
.png)
Future Boston 3D model
For Episode 1 of Star Trek: Picard our team was given background plates that weren't suitable for the camera angles. Our solution was for me to roughly model a Futuristic Boston based on their background plate. This way we had more flexibility for achieving accurate backgrounds. Below are stills from the final cut.
.png)
.png)
Below is my model as seen from Maya's viewport.

Google Earth helped me pin point the real world location of their background plate. With this I took screenshots of Google model and ran them through "Photoscan" to generate an accurate 3D model of the real world location.


Paper Mach'e material
.png)
.png)
.png)
Made in Substance Designer, this material has several parameters artists can adjust to tweak the look for their Paper Mach'e model.


.png)
.png)
.png)
Real time Leon from Resident Evil 4


After recent rumors of a Resident Evil 4 remake being in development I got excited and made this model in hopes of seeing how a redesign of Leon may look. The base was designed in "Character Creator". The face and assets were designed in Zbrush and textured in Substance Painter. Rigged and ready for use in Unreal, Unity and Maya.


Custom VDM Brushes


Creating Vector Displacement brushes in zbrush helped me speed up my sculpting workflow tremendously. this way I can reuse parts across different models. My anatomy Brush lets me block out a solid head mesh in very little time
The base head seen below was created in a matter of minutes.


Hard Surface Alien Suit

My goal with this project was creating a hard surface suit. I drew inspiration from Evangelion, Spider-man from Avengers: Infinity War and Master Chief.

The model was sculpted in Zbrush using primarily the ClayBuildup and DamStandard brush. The Clay Polish feature helped sharpen the edges, getting rid of any awkward shapes that make it look like a clay sculpture.
I used Zremesh to calculate clean topology and exported into Substance Painter. From there I finish it off with a nice coat of paint and emissive maps to make the eyes glow.


Real Time VFX Breakdowns
bottom of page